Friday 30 January 2015

Enabling duplex (two sided printing) on HP Printers for Microsoft Word etc.

It appears some HP printers are provided with drivers which by default have the duplex functionality turned of at driver level, presumably because some other forms of the printer do not provide duplex functionality. Anyway in order to enable duplex functionality at driver level (which will allow programs such as Microsoft Word to perform duplex printing) just follow these steps: 
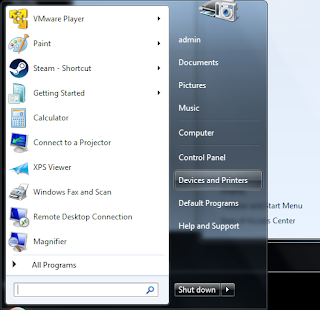
Firstly go to the "Printers and Devices" section from the Start Menu:
Now we will right-hand click on the target printer and select "Printer Properties":
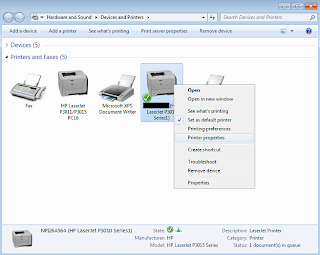
And finally we click on the "Device Settings" tab and change the "Duplex Printing" drop-down to "Installed". Apply the changes and then restart Microsoft Word etc.
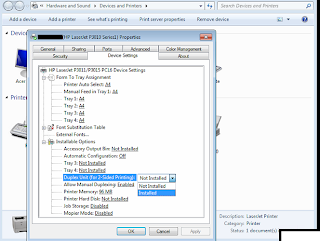
You will now have the ability to print duplex documents as below:
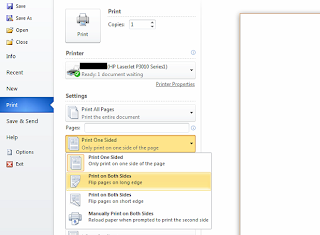
Thursday 29 January 2015

Windows cannot start this hardware device because its configuration information Code 19 Fix

After having to manually remove a bodged installation of a questionalable antimalware product called 360 Security by a chinese firm I noticed that there were specific devices that were not working correctly - after reviewing the device manager I noticed a yellow explanation mark over the hardware in question (a webcam) - and the error code:
Windows cannot start this hardware device because its configuration information (in the registry) is incomplete or damaged. (Code 19)
After a little research it looks as if this error is commonly caused by errorous filter driver entries within the registry. A filter driver allows you to extend or modify a pheriphial device. There are two types: the Upper Filter drivers work between the Operating System and the main driver and Lower Filter drivers that work between the main driver and the hardware itself. So we must firstly use the registry editor to go to the following location: HKLM\SYSTEM\CurrentControlSet\Control\Class All entries under here are specific classes of devices, such as Mass Storage devices, Imaging devices and so on (like you would see categorized in the Device Manager) The names of the keys are pretty cryptic and so we need to identify which key the "Imaging Devices" comes under - you can either scroll through each key and check the "Class" attribute or see below for the specific key :)
{6BDD1FC6-810F-11D0-BEC7-08002BE2092F}
Now we should hopefully see a "UpperFilters" value as show below: We simply now remove the 360Camera entry, although we should leave the "ksthunk" entry as it vital and comes as part of the operating system. Now finally simply restart the operating system and all should work! (You could also remove the device completly and re-add it if you are still facing problems.) In summary: In this specific instance it appeared that 360 Security had been using an upper filter driver in order to provide some kind of monitoring / protection for imaging devices - including webcams. And because the driver had already been manually removed from the system the main driver was failing to initialize properly causing the "error Code 19" message.

Tuesday 27 January 2015

How to delete a corrupted roaming profile on Windows 7 (You have been logged on with a temporary profile)

Firstly right hand click on your computer and go to Properties, we proceed by selecting the "Advanced System Settings" and then select the User Profiles "Settings" button in the popup screen as shown below: Now we select the desired profile and hit the delete button as below: ** Note: Always be sure to make sure you backup the roaming profile before deleting it! ** In the even you have just simply delete the profile path, you will also need to remove a key from the registry: HKLM\SOFTWARE\Microsoft\Windows NT\CurrentVersion\ProfileList - you will see a number of SID's - delete the appropriate one, logout and then log back in again to test. Credit:
http://www.grouppolicy.biz/2011/07/how-to-reset-a-roaming-profile-in-windows-7/

Command line to remove or move user roaming profile with Server 2012

The following two commands let you firstly take ownership of all the files in the specified folder and then grant full access to the files to the administrators group.
takeown /f /r /d y icacls /grant administrators:F /T
You can also use the following script (credit to: http://WinHelpOnline.com ):
Windows Registry Editor Version 5.00 ;Adds Take Ownership command to the context menu in Vista or Win 7 ;Also provides "Administrators" group with Full Control permissions. [-HKEY_CLASSES_ROOT\*\shell\runas] [HKEY_CLASSES_ROOT\*\shell\runas] @="Take Ownership" "Extended"="" "NoWorkingDirectory"="" [HKEY_CLASSES_ROOT\*\shell\runas\command] @="cmd.exe /c takeown /f \"%1\" && icacls \"%1\" /grant administrators:F" [-HKEY_CLASSES_ROOT\Directory\shell\runas] [HKEY_CLASSES_ROOT\Directory\shell\runas] @="Take Ownership" "Extended"="" "NoWorkingDirectory"="" [HKEY_CLASSES_ROOT\Directory\shell\runas\command] @="cmd.exe /c takeown /f \"%1\" /r /d y && icacls \"%1\" /grant administrators:F /t"
Simply save it with a ".reg" file extension. You should then be able to right click a folder WHILE holding down shift and selecting "Take Ownership."

Monday 26 January 2015

Setup a test Exchange Server 2013 SP1 on lab environment

Pre-requisites: x1 Windows Server 2008 R2 Machine (4GB RAM, 50GB Disk) for the inner server roles. x1 Windows Server 2008 R2 Machine (4GB RAM, 50GB Disk) for the outer server roles (Edge) Domain name with DNS control >Firstly I created the new VM in the Developer Cloud section - a standard template of Windows 2008 R2 suffices for this need (along with >the default of 4GB of RAM) It is also important to make sure that we modify the firewall settings under the VM instance's "Network" tab >in order to make sure that we allow internal and external SMTP traffic: tcp:25 We will also need to download Exchange Server 2013 SP1 (this is because earlier versions do not include the Edge Transport Server role - and actually required the 2010 Edge Server to function at the time!) Upon installing Exchange Server 2013 with just the Edge Transport server role we can now check that the services are running as expected within the Exchange Management Shell: Test-ServiceHealth and the required components are installed on the server: Get-ServerComponentState We will now need to register a domain name for our test instance and setup the MX and PTR records for the domain: We will also need to setup a domain for internal use, since this is a test system we can install Exchange inner zones roles on the same VM (although this is not recommended by Microsoft and has specific drawbacks: http://technet.microsoft.com/en-us/library/ms.exch.setupreadiness.warninginstallexchangerolesondomaincontroller%28v=exchg.150%29.aspx ) Pre-requisites for DC (inner server) - which will act as the Mailbox and Client Access Server: - Active Directory - .NET Framework 4.5 (only if installing on Server 2008 R2) - Windows Management Framework (WMF) 4.0 - Upgrade the AD schema - Numerous windows features - Windows Identity Foundation (Windows6.1-KB974405-x64.msu) - Hotfix KB2619234 (437879_intl_x64_zip.exe) - Microsoft Unified Communications Managed API 4.0 (UcmaRuntimeSetup.exe) So if you are using 2008 R2 let's install the required features (using Add-WindowsFeature - as Google uses 2008 Datacentre - not R2!): Add-WindowsFeature AS-HTTP-Activation, Desktop-Experience, RPC-over-HTTP-proxy, RSAT-Clustering, Web-Mgmt-Console, WAS-Process-Model, Web-Basic-Auth, Web-Client-Auth, Web-Digest-Auth, Web-Dir-Browsing, Web-Dyn-Compression, Web-Http-Errors, Web-Http-Logging, Web-Http-Redirect, Web-Http-Tracing, Web-ISAPI-Ext, Web-ISAPI-Filter, Web-Lgcy-Mgmt-Console, Web-Metabase, Web-Mgmt-Console, Web-Mgmt-Service, Web-Request-Monitor, Web-Server, Web-Stat-Compression, Web-Static-Content, Web-Windows-Auth, Web-WMI, RSAT-ADDS Or if you are using 20012 let's install the required features: Install-WindowsFeature AS-HTTP-Activation, Desktop-Experience, NET-Framework-45-Features, RPC-over-HTTP-proxy, RSAT-Clustering, RSAT-Clustering-CmdInterface, Web-Mgmt-Console, WAS-Process-Model, Web-Asp-Net45, Web-Basic-Auth, Web-Client-Auth, Web-Digest-Auth, Web-Dir-Browsing, Web-Dyn-Compression, Web-Http-Errors, Web-Http-Logging, Web-Http-Redirect, Web-Http-Tracing, Web-ISAPI-Ext, Web-ISAPI-Filter, Web-Lgcy-Mgmt-Console, Web-Metabase, Web-Mgmt-Console, Web-Mgmt-Service, Web-Net-Ext45, Web-Request-Monitor, Web-Server, Web-Stat-Compression, Web-Static-Content, Web-Windows-Auth, Web-WMI, Windows-Identity-Foundation So let us prepare the AD schema: setup /PrepareSchema /IAcceptExchangeServerLicenseTerms setup /PrepareAD /OrganizationName: /IAcceptExchangeServerLicenseTerms We can then proceed by launching setup.exe and following the wizard prompts. *We only want to install the Client Access and Mailbox Server on this VM* Initially, we will have to add the inner Exchange server's certificate into the certificate store on client machines through AD / group policy - otherwise we will get a root trust warning like below: We also need to create a CNAME record on our local DNS server for the domain: CNAME Alias: autodiscover.mydomain.internal CNAME Target Host: exchange-gz.mydomain.internal We can now create a new user via the exchange web admin portal and then add a client workstation onto the domain, install Outlook 2010 / 2013, login with an AD user that has an assoiciated Exchange mailbox and launch the Outlook 2013 first run / mailbox setup wizard and your settings should be auto-detected my Outlook. Now we can deploy the VM for our Edge Transport role - as above we will install the same list of features and roles. We must also make sure (as this will NOT be joined to the domain) that we have added a DNS suffix of the domain name we are using - in my case edge-server.mydomain.internal When the installation has finished we can check the services are running correctly: > test-servicehealth Now in order to hook up the GZ and DMZ services we will use a mechanism called EdgeSync which allows the Edge Server in the DMZ to access AD data from the GZ without being joined to the domain! Although in order for this to work you MUST have AD LDS (Light Directory Services) configured on the DMZ server! We will firstly export a EdgeSync configruation to import onto the GZ server - this is done on the DMZ server as follows: New-EdgeSubscription –FileName "C:\subscription.xml" We must also add an A record to Active Directory for the DMZ server. And finally import the edge subscription key into the GZ server: New-EdgeSubscription -FileData ([byte[]]$(Get-Content -Path "subscription.xml" -Encoding Byte -ReadCount 0)) -Site "Default-first-site-name" Because we installed the Mailbox Server and Client Acces Role on the same server we need to configure port 2525 using: Set-SendConnector "EdgeSync – Inbound to Default-First*" -Port 2525 and now we start the EdgeSync!: Start-EdgeSynchronization -Server EXCHANGE-GZ.MYDOMAIN.INTERNAL -TargetServer EDGE-SERVER.MYDOMAIN.INTERNAL -ForceFullSync We can now attempt to send a message using telnet to the Edge Server, although firstly we must make sure the DNS is setup correctly - see the following post for more information: http://blog.manton.im/2015/01/451-440-dns-query-failed-error-was-dns.html So let us Telnet into the SMTP service on the edge server: telnet 25 HELO gmail.com MAIL FROM: thesender@gmail.com MAIL TO: therecipient@mydomain.internal DATA . You should get a return code of 250 and some kind of success message. We can now check the mail queue on the Edge Server to make sure that it has gone through OK and finally check the clients inbox - although the message will quite possibly end up in the Junk Mail folder - since the reverse DNS check would have been invalid on the sender. Now we also want external entities to send mail to our users on the domain, so for this we will setup address mapping and an addressing policy from the Mail Flow tab - since our internal domain and the external will be different. We can then verify that the users have the an email alias of the external domain under the user information: "Email Addresses" tab and if so we can send an email to this address from an external email provider to test. We also need to configure a domain name, assign an MX record(s) and also create an SPF record to specify which mail servers are allowed to send email from the domain. QUESTION: HOW TO SETUP EMAIL< SO EXTERNAL DOMAIN IS DIFFERENT TO THAN INTERNAL DOMAIN! VIRTUAL ALIAS MAPPING http://www.exchangelog.info/2007/05/ports-that-need-to-be-open-on-firewall.html http://www.mustbegeek.com/configure-external-and-internal-url-in-exchange-2013/

Sunday 25 January 2015

EMS (Exchange Management Shell) Common and Useful Commands

I decided to compile a list of common and useful commands to set and get and assortment of information with Exchange 2013.

Return health information related to Exchange services:
Get-HealthReport -Identity <server-name> -RollupGroup

Get transport service information:
Get-TransportService | Format-List
Set internal DNS server for transport service: Set-transportservice -InternalDNSServers "192.168.0.100" Get all of the send connectors:
Get-SendConnector
Get all of the recieve connectors:
Get-ReceiveConnector
View all queues on a specific server:
Get-Queue -server
Enable protocol level logging within Exchange:
Set-TransportService -IntraOrgConnectorProtocolLoggingLevel Verbose

451 4.4.0 DNS query failed. The error was: DNS query failed with error ErrorRetry Solution

I encountered this issue when initially setting up an Exchange lab. I had attempted to send an email to the local domain on the inner network and the transport server was failing to forward this onto the inner server - returning the following error:
451 4.4.0 DNS query failed. The error was: DNS query failed with error ErrorRetry
I checked my DNS settings and performed a quick nslookup to verify that the correct MX record was in place for the domain it was failing to resolve - although everything looked OK*. I also found out that the transport server can also use it's own set of DNS servers rather than the NIC's default one(s). To verify this I used the following powershell cmdlet:
get-transportserver | FL *DNS*
As we can see above there are no explicit internal DNS servers set and the InternalDNSProtocolOption is set to ANY - so it will pickup the default NIC DNS servers. Finally I found the solution - I was using a public DNS for secondary DNS server - and for some reason the transport server was not using the primary DNS server - in a typical environment a forwarder would be put on place on an internal DNS server instead of explicitly setting one on the NIC but as this was a lab it was omitted! Simply removing the public DNS entry on the NIC did the trick and retry the queue operation. I could of course also explicitly set the appropriate DNS server on the transport server configuration.

Check an MX record from command prompt

We firstly launch the command line utility 'nslookup': nslookup We then make sure the appropriate record type is selected - in this case MX: set type=MX And finally the domain we wish to lookup: live.com

Tuesday 20 January 2015

Allow the administrator to view all of the users emails in Office 365 via PowerShell

Firstly we must store your administrative Office 365 login details: $UserCredential = Get-Credential And then we create the powershell session to remotely access office 365 servers:
$Session = New-PSSession -ConfigurationName Microsoft.Exchange -ConnectionUri https://outlook.office365.com/powershell-liveid/ -Credential $UserCredential -Authentication Basic -AllowRedirection
This will import all of the relevent modules so you can use them on your local shell: Import-PSSession $Session We can now run the following command in order to allow the administrator to view all user accounts:
Get-Mailbox -ResultSize unlimited -Filter {(RecipientTypeDetails -eq 'UserMailbox') -and (Alias -ne 'Admin')} | Add-MailboxPermission -User admin -AccessRights fullaccess -InheritanceType all -AutoMapping $False
And finally when done you can disconnect from the powershell session by using:
Remove-PSSession $Session