Saturday, 28 February 2015

How to move the location of a mailbox database in Exchange 2013

We firstly query Exchange via the EMS to list all available databases:
Get-MailboxDatabase
Once you have identified the database, we can double check the current mailbox location on the file system:
Get-MailboxDatabase -Identity "Mailbox Database 000001" | Format-List | Select-String -Patern "EdbFilePath" -SimpleMatch
We then dismount the database:
Dismount-Database "Mailbox Database 000001"
Then we use the "Move-DatabasePath" cmdlet to move the location on:
Move-DatabasePath "Mailbox Database 000001" -EdbFilePath "D:\Mailbox Database 000001\Mailbox Database 000001.edb" -LogFolderPath "D:\Mailbox Database 000001\"

Friday, 27 February 2015

Using RBAC with Exchange 2013

RBAC allows you to categorize users into different groups and then apply specific roles to that group. By nature it is very granular allowing you to assign for example a specific user only very specific available commands in the Exchange Management Shell. For more information on RBAC see here.

Understanding Exchange Workload Management with Exchange 2013


It optimizes the resource the utilization (CPU, Database RPC Latency etc.) for the users and system.

It performs this by assigning specific processes higher or lower (dependent on need) priority levels.

Typically a workload typically comprises of one of the following:
Exchange Server Feature: Mailbox Role
Exchange Service: OWA, ActiveSync etc.
Protocol: IMAP4, POP3 etc.

You also have the ability to control how users use recourses:
- Burst Allowances: Defines how much burst the user is entitled to until there connection is throttled.
- Traffic Shaping: Causes uses to have "micro-delays" when the server recourse limit hits a pre-defined value - lessening the load on the server before it gets worse.
- Maximum Usage: When a user exhausts the maximum usage limit, the recourse can be temporarily blocked.

To view a throttling policy you can use the "Get-ThrottlingPolicy" cmdlet:

Get-ThrottlingPolicy | Format-List

To view throttling policy associations you can use the "Get-ThrottlingPolicyAssociation" cmdlet:

Get-ThrottlingPolicyAssociation -ResultSize 10 | Format-List

For more information and how to create / set and delete policies see here.
https://technet.microsoft.com/en-GB/library/jj150503%28v=exchg.150%29.aspx

Setting up Layer 4 and 7 Load Balancing with Exchange 2013

Typically you would have two layer 3 load balancers that create a virtual IP for external access (client resolves a namespace to a virtual IP) - they are then routed to one of a pool of client access servers within a load balance cluster. From thier the Client Access Server will query AD (by performing a service discovery) for the Exchange Version and where abouts the mailbox exists in the DAG's mailbox servers - it then proxies the request to the appropriate mailbox server (including re-routing the request through another client access server if the mailbox server is not directly reachable from the current Client Access Server.

In order to setup load balancing in Exchange 2013 we will have two servers with Client Access and Mailbox roles installed.

At the perimeter we will have a layer 4 load balancer which uses a virtual IP and a DNS entry we configured on the external DNS server - or if we don't have access to that technology we can utilize the "round-robin" feature on the AD DNS server e.g. clientacess.mydomain.com OR alterntivaley we could setup a namespace for our servers - which in turn will require us to install the clustering feature on both of the servers.

We will then require to make some changes to the hostname used for "Outlook Anywhere" feature on the client access server - they must both conform to the same name (clientaccess.mydomain.com):

Get-ClientAccessServer | Get-OutlookAnywhere | select identity,*hostname // To check the current hostnames

Get-OutlookAnywhere | Set-OutlookAnywhere -InternalHostname clientaccess.mydomain.com -InternalClientsRequireSsl $false // Sets the hostname for Outlook Anywhere

And finally we can check that they resolve correctly:
nslookup clientaccess.mydomain.com

Mobile Device Management and ActiveSync with Exchange 2013

Exchange ActiveSync allows mobile devices to connect to an Exchange server over HTTP and XML (avilable over ports 80 and 443) and access your email, calender, contacts etc. It is specifically optimized for high-latency, low bandwidth networks - hence suiting mobile phones and portable devices that rely on a mobile network as a means of data.

Within EAC you can setup mobile device policies by going to Mobile > Mobile Device Mailbox Policies and enable / disable Mobile Device access from here.

OWA (Outlook Web App) Policies

OWA Policies allow you to enable and disable functionality to users of OWA. The policy settings can be accessed from the EAC > Permissions > OWA Policies.

For example you can prevent users from changing thier passwords, direct access to files.

New in 2013 also allows you to have an offline version of the web app, that requires the user to have an HTML5 compliant browser - this can also be enabled / disabled.

Copying files and folders while retaining the security permissions

You can make use of RoboCopy to accomplish this:
robocopy <source-directory> <destination-directory> /W:2 /MIR /SEC /FFT /R:3
/W:2 Specifies the wait time while attempting to access a file.

/R:3 Specifies how many times to attempt to access a file - for example if the file was locked RoboCopy would retry the copy operation.

/MIR Creates an exact mirror of the files and folders.

/SEC Copies the exact NTFS permissions of the files and folders.

Thursday, 26 February 2015

What is Outlook Anywhere?

Outlook Anywhere allows you to access Exchange via RPC over HTTPS - this enables you to traverse through firewalls easily without having to open up RPC ports. By default RPC over HTTPS is enabled in Exchange 2013 due to the fact plain RPC is no longer supported (Hence the removal of the Client Access RPC Server).

Changes to the Client Access Server in Exchange 2013

The following in an excerpt from TechNet:

Unlike previous versions of Exchange, Exchange 2013 no longer requires session affinity at the load balancing layer.
To understand this statement better, and see how this impacts your designs, we need to look at how CAS2013 functions. From a protocol perspective, the following will happen:
  1. A client resolves the namespace to a load balanced virtual IP address.
  2. The load balancer assigns the session to a CAS member in the load balanced pool.
  3. CAS authenticates the request and performs a service discovery by accessing Active Directory to retrieve the following information:
    1. Mailbox version (for this discussion, we will assume an Exchange 2013 mailbox)
    2. Mailbox location information (e.g., database information, ExternalURL values, etc.)
  4. CAS makes a decision on whether to proxy the request or redirect the request to another CAS infrastructure (within the same forest).
  5. CAS queries an Active Manager instance that is responsible for the database to determine which Mailbox server is hosting the active copy.
  6. CAS proxies the request to the Mailbox server hosting the active copy.
Step 5 is the fundamental change that enables the removal of session affinity at the load balancer. For a given protocol session, CAS now maintains a 1:1 relationship with the Mailbox server hosting the user’s data. In the event that the active database copy is moved to a different Mailbox server, CAS closes the sessions to the previous server and establishes sessions to the new server. This means that all sessions, regardless of their origination point (i.e., CAS members in the load balanced array), end up at the same place, the Mailbox server hosting the active database copy.This is vastly different from previous releases – in Exchange 2010, if all requests from a specific client did not go to the same endpoint, the user experience was negatively affected.

Automapping feature in Exchange 2013

The automapping feature allows users who have "Full Access" permissions to another inbox(es) to automatically have those inboxes added to thier Outlook client.

In order to setup automapping we can use the Add-MailboxPermission cmdlet:
Add-MailboxPermission -Identity jbloggs -User 'Joe Bloggs' -AccessRight FullAccess -InheritanceType All -Automapping $true

And to disable automapping we can use the Set-MailboxPermission cmdlet:
Remove-MailboxPermission -Identity jbloggs -User 'Joe Bloggs' -AccessRight FullAccess -InheritanceType All -Automapping $false
Add-MailboxPermission -Identity jbloggs -User 'Joe Bloggs' -AccessRight FullAccess -InheritanceType All -Automapping $true

Setting mailbox and mailbox folder permissions with Exchange 2013

The end user is able to set thier mailbox permissions via the Outlook client, but as an administrator we can manage the permissions remotely using the Exchange Management Shell.

To manage a users mailbox permissions we use:
Set-MailboxPermission -Identity "Joe Bloggs" -User jbloggs -AccessRights FullAccess -InheritanceType All
Get-MailboxPermission -Identity "Joe Bloggs" | Format-List
Remove-MailboxPermission -Identity "Joe Bloggs" -User jbloggs -AccessRights FullAccess -InheritanceType All
Add-MailboxPermission -Identity "Joe Bloggs" -User jbloggs -AccessRights FullAccess -InheritanceType All

Add-MailboxFolderPermission -Identity [email protected]:\Personal -User jbloggs -AccessRights FullAccess -InheritanceType All
Set-MailboxFolderPermission -Identity [email protected]:\Personal -User jbloggs -AccessRights FullAccess -InheritanceType All
Get-MailboxFolderPermission -Identity [email protected]:\Personal -User jbloggs -AccessRights FullAccess -InheritanceType All
Remove-MailboxFolderPermission -Identity [email protected]:\Personal -User jbloggs -AccessRights FullAccess -InheritanceType All

The user can change thier own inbox permissions by right-hand clicking on thier email and selecting "Folder Permissions."

Wednesday, 25 February 2015

Enable data deduplication on Server 2012

Data deduplication can be an effective way of saving disk, although if misused can easily choke the disk I/O and CPU time.

We will firstly install the Data Deduplication feature in the "File and Storage Services" role:


We will then identify the volume we wish to enable data-dedeplication on from the Server Manager > right-hand click and select "Configure Data-deduplication":


We will then specify the data de-duplication type - which will instruct the feature to work in a specific mode dependent on the role of the server.

And finally we will select "Set Deduplication Schedule" to specify pre-defined periods where the deduplication will occur or simply leave the default of "Enable background optimization" - which will invoke the deduplicaion during quiet periods:


Installing intermediate certificates for IIS 7.0

In order to import intermediate certificates into IIS we will use the local Windows Certificate store - to do this we will firstly launch mmc and add the "Certificates" snapin - although make sure that it is added as under the "Local Computer" account:


Now we will browse down the tree until we find "Intermediate Certificates" > "Certificates" - right hand click and import - dependent on the format of the certificates you might need to enter *.* to see all file formats while browsing for the certificates. Finally import and reset IIS:
iisreset

Tuesday, 24 February 2015

Diagnosing iSCSI connection between Server 2012 inittiaor and a Server 2012 target server

For this lab we will assume that there are two Server 2012 boxes, configured on an isolated network of 192.168.0.0/24. Server 1 will be 192.168.0.1 and server 2 will be 192.168.0.2.

We will firstly install Wireshark for this process and then start capturing packets on the appropriate interface.

We start by launching the "iSCSI inittiator" on the client and going to:
Discovery > Discover Portal > Enter the IP address of the ISCSI target > Advanced > Select the local adapter > Select the initiator IP > OK and accept.

Now go to the targets tab and click refresh.

We can then stop our packet capture and then type the following in the Wireshark filter: "iscsi":


You should (if performed correctly) see a series of iSCSI packets (you might see different sessions as well) - choose one - right hand click on "Login Command" and select "Follow TCP Stream" - close down the "Follow TCP Stream" dialog box and your filter should be set to something like "tcp.stream eq X".

You should now see the TCP negotiation and the first iSCSI command called "Login Command" - I will now go briefly through the process flow of the iSCSI discovery in accordance with the stream below:

Login Command (0x03): This is the initial step of the discovery - as the title suggests the iSCSI initiator is attempting to access the iSCSI target - in my case no authentication is being applied so we can connect anonomously.

Login Responce (0x23): Returns whether or not the initiator is authenticated.

Text Command (0x04): The initiator then uses the "Text Command" to send the query "SendTargets=All" - which simply asks for all available targets for the initiator (this is also where the authorization takes place on the target server.)

Text Response (0x24): The target server then returns all available target servers.

Logout Command (0x06): The client requests to logout from the target server.

Logout Reponse (0x26): The target server confirms the logout process to the initiator.

What does the _msdcs zone do?

This zone is present as a subdomain under each domain and advertises all of the different services available - such as LDAP and kerboros.

There is also a several other subdomains:

dc: Used by clients to identify which domain contoller(s) it should use.
pdc: Used to identify the primary domain controller of the domain.

There is also a _msdcs zone in the root forest domain - although there are a few differences:

- All DC's in the entire forest register a CNAME record here (required for replication)
- There is a GC subdomain that lists all of the global catalog servers.
- There is a domains subdomain that lists all of the domains along with their GUID's.

Recommended average disk queue length for a RAID Array or LUN

Firstly setup a performance monitor for the RAID array or LUN and add the "Average Disk Queue" counter to the monitor. For example if our average was 10 for the RAID array and there were 6 disks in the array we could do 10 / 6 which is: 1.67 which is below 2 per disk (which is the reccomended average.)

Measuring disk performance using performance monitor on Server 2012

The following counters each offer you vital information when attempting to diagnose disk perfomance issues, with either a LUN, RAID Array or simply a single disk (taken from TechNet):

%Disk Read Time, %Disk Write Time, %Disk Time, %Idle Time: All of these can be important, but keep in mind that they are only reliable when dealing with single disks. Having disks in RAID or a SAN setup can make these numbers inaccurate.

Average Disk Queue Length: A good counter to monitor if requests are backed up on your disk. Any sustained number higher than 2 is considered problematic. However, just like the counters above, this one is not considered reliable except when dealing with single physical disk per volume configurations.

Average Disk Second/Read, Average Disk Second/Write, Average Disk Second/Transfer: These are probably my favorite disk counters. They tell you how long, in seconds, a given read or write request is taking. (Transfer is considered a Read\Write round trip, so is pretty much what you get if you add the other two.) These counters tell you real numbers that deal directly with disk performance. For instance, if you see that your Average Disk Seconds/Write is hitting .200 sustained, that tells you that your write requests are taking a full 200 ms to complete. Since modern disks are typically rated at well under 10 ms random access time, any number much higher than that is problematic. Short spikes are okay, but long rises on any of these numbers tell you that the disk or disk subsystem simply is not keeping up with load. The good thing is, these being real numbers, the number of disks or how they are configured is really not important. High numbers equate to bad performance regardless.

Current Disk Queue Length: Don’t bother with this counter. It measures instantaneous disk queue numbers, and as such is subject to extreme variance. You can get much more useful numbers by using the Average Disk Queue Length counters mentioned above.

Disk Bytes/Second, Disk Read Bytes/Second, Disk Write Bytes/Second: These counters tell you how much data is being read from or written to your disks being monitored. The number by itself doesn’t mean anything, but in combination with other counters can be telling. For instance, let’s say it is reporting that you are writing 100 MB/second to the disk. Is this too much? Not if overall performance is still good. If however, your disk access times are getting high, you can see if you can correlate this to the load reported by this counter and calculate exactly how much your disks can handle before becoming slow.

Disk Reads/Second, Disk Writes/Second, Disk Transfers/Second: These counters tell you how many operations are occurring per second, but not how much as being transferred. It is possible for instance to have a large amount of very small requests causing performance issues, but overall throughput may not be high enough to seem problematic. This counter can be used in the same way as the Disk Bytes/Second counters, but measure operations instead of throughput.

Cluster error: "There was an error cleaning up the cluster nodes."

This could be down to a lot of conditions, but just to help anyone else out there I will outline why I recieved this error message.
There was an error cleaning up the cluster nodes.
It occured because I was trying to setup a two node failover cluster with ADDS installed / one of the members being a domain controller. Although I found contradicting information - the overall stance appears that this setup is not supported.

Monday, 23 February 2015

Generate a new SID for Windows Server 2008 / 2012 R2

Quite often if an operating system clone has failed you will be presented with the following message when attempting to join a server using a DC that was cloned improperly:
"The domain join cannot be completed because the SID of the domain you are attempting to join was identical to the sid of this machine."
We can generalize the operating system to resolve this issue by launching sysprep and selecting the "Generalize" option and then restart into OOBE (Out of Box Experience.):
C:\Windows\System32\Sysprep\sysprep.exe
Upon getting back into the OS again we can use the utility called psgetid provided by sysinternals to confirm that we have been allocated a new SID.

Deploying Windows 10 with SCCM 2012 R2


Forwarning: This is not officially supported with SCCM 2012 R2 - do not use on a live system!

We will firstly download the Technical Preview iso from Microsoft (Windows10_TechnicalPreview_x64_EN-GB_9926)

We will place this in our sources share for SCCM under a new folder named "OS" and then use a tool like 7zip to extract the ISO's contents to a new folder in there.

We can then proceed by adding a new "Operating System Installer" and upon completion we will then distrbute it to our distribution point.

We will then create a new Task Sequence for the Windows 10 build. We will "Build and Capture a refernce operating system image":
- Select the appropriate boot image.
- We will then be asked to provide the image package for the OS - although Windows 10 will not show up! So for now we can select anything else we already have e.g. Windows 8. We will then go through all of the domain, updates and application wizards - just accept the defaults for these and finish the task sequence. Finally we will specify where we want the output WIM image to go.

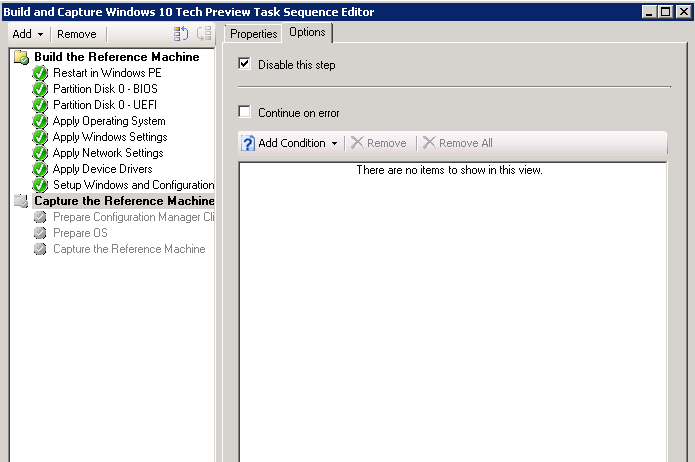
Once the TS has been created click on "Edit" and make sure you disable the whole "Capture the Reference Machine" group as shown below:


We will also disable the driver integration as it will not work - although there is a workaround.

And now if we select the "Apply Operating System" task and change it from "Apply operating system from a captured image" to "Apply operating system from original installation source" and specify the path of our extracted ISO.

And then deploy finally deploy the Task Sequence and test!

Friday, 20 February 2015

Fixing a Content Index Catalog Corruption

This database contains the seeding information for databases inside a DAG - for example if two mailbox servers are part of a DAG and the Content Index Catalog becomes corrupted - it means the logs / transactions exchanged with the other mailserver has caused the database to become corrupted.

We can use the following command to resolve the issue:
Update-MailboxDatabaseCopy -Identity "<server-name>\<hostname>" -CatalogOnly

Repairing a corrupt mailbox database with Exchange 2007/2010/2013

Using the eseutil.exe tool you are able to repair mailbox databases that may have become corrupted.

We will firstly identify the mailbox database:

Get-MailboxDatabaseCopyStatus

If you are using Exchange 2007 or below you must then make sure it is unmounted before we attempt the repair:

Dismount-Database -Identity <database>

** During a database being in a unmounted / failed state log files will remain untouched, but the database mail queue will build up. **

** Make sure database in unmounted and no file locks are on it! **

We can then launch an integrity check on the database:

eseutil /g // Check the integrity of the mailbox database

We can also use the file dump mode that provides us with diagnostics about the database:

eseutil /mh <path-to-db>

If you are using 2010 and above this tool can actually run while the database is mounted (by utilizing the volume shadow copy service.)

    eseutil /mh /vss /vssrec <path-to-db>
  
** An indication that something is not quite right is the status of the database is in a "DirtyShutdown" state. **
  
We can now invoke a repair of the database...

You have two options:

- Soft repair: "eseutil /r" which activates recovery mode - which consumes all of the log files (and hence tries to recover data within them):

eseutil /r <logfile-prefix> /d <path-to-database-directory> /l <path-to-database-log-directory>

- Hard Recovery: "eseutil /p" which is used when there are no log files available OR are no in a clean state / corrupted:

eseutil /pd <database-filepath> // Perform repauir process - but don't repair the database, just scan for errors
eseutil /p <database-filepath> don't repair the database

We might additionally want to replay the log files to the database before mounting:

eseutil /r /s <location-of-log-files> /s <location-of-system-files>

And finally mount the database:

Mount-Database -Identity <database>

Thursday, 19 February 2015

Setting up a Hyper-V Replication Cluster with Server 2012 R2


The below outlines how to setup a basic three member failover cluster (including a file share witness.)

Hardware Setup:
-          x2 8GB Servers w/ 120GB Disk. (VHOST01 and VHOST02)
-          x1 8GB Server /w 500GB Disk (SAN)

Firstly we will enabled Virtualization Extensions on both VHOST01 and VHOST02 from the BIOS and restart the servers. A Hyper-V cluster requires an active directory so we will install ADDS and setup a new forest on VHOST01 and then join VHOST02 to the domain.
Now we can install the Hyper-V role (including the management tools) on both servers and proceed to setup the cluster. We will need to install the Cluster feature:
 
Install-WindowsFeature –Name Failover-Clustering –IncludeManagementTools

We will create a new VSwitch for our replication traffic (on it's own network) and one for the management network: 

New-VMSwitch “DEVNET” –NetAdapterName “Ethernet 2” –AllowManagementOS:$True


** It is also worth noting that once this command is run, Hyper-V creates a virtual switch using the “Hyper-V Extensible Virtual Switch” module that is used on the physical NIC – while disabling IPv4, IPv6 etc – all of these are enabled / routed to the virtual NIC instead.
Let’s use the subnet mask of 255.255.248.0 for the network 172.16.1.0, so we can have up to 6 hosts in the cluster – although for this example we will only be using two nodes in the cluster.

Make sure that both nodes of the cluster have the same NIC names / exact setup!
Verify the consistency of the adapters using “Get-NetAdapter” and confirming with the Hyper-V switch manager.

We can run a cluster test as follows:

Test-Cluster -Node 172.16.1.1,172.16.1.2

Once the cluster has been provisionally approved it we can proceed to create it:

New-Cluster –Name DEVNETCLUSTER01 –Node 172.16.1.1,172.16.1.2 –StaticAddress 172.16.1.3

We can then complete our quorum by adding our File Share Witness:

Set-ClusterQuorum –Cluster DEVNETCLUSTER01 –NodeAndFileShareMajority \\FILESERVER01\WitnessShare